The Culinary Magic of Peshawii Mushrooms : A Must-Try!

An artistic display of Peshawii, sautéed and garnished with fresh herbs, served in a rustic bowl alongside spices.

Discover the savory world of Peshawii mushrooms—a delicious dish for every occasion!

Peshawii mushrooms are a savory and delicious dish originating from the rich culinary traditions of Pakistan. They showcase the unique flavors and spices that define Pakistani cuisine. This delightful recipe highlights the versatility of mushrooms as a key ingredient, making them an ideal choice for any meal. Whether served as an appetizer or a main course, Peshawii mushrooms add a burst of flavor to your dining experience.

A Taste of Tradition

When preparing this recipe, you engage in an age-old tradition that combines fresh ingredients with aromatic spices. The use of mushrooms in this dish creates a hearty meal that is both satisfying and nutritious. Culinary heritage is preserved in each bite, connecting you to the rich history of Pakistani cooking.

Perfect for Any Occasion

Peshawii mushrooms are a savory and delicious dish originating from the rich culinary traditions of Pakistan. They showcase the unique flavors and spices that define Pakistani cuisine. This delightful recipe highlights the versatility of mushrooms as a key ingredient, making them an ideal choice for any meal. Whether served as an appetizer or a main course, Peshawii mushrooms add a burst of flavor to your dining experience.

What are Peshawii Mushrooms ?

Peshawii mushrooms are a flavorful dish from the Peshawar region of Pakistan. Known for their rich taste and aromatic spices, these mushrooms are popular in traditional Pakistani cuisine. The dish highlights the natural umami flavors of mushrooms, making them versatile for various meals.

The Essence of Peshawii Mushrooms

Peshawii mushrooms are created using fresh mushrooms sautéed with bold spices. Garlic, ginger, cumin, and coriander add depth to the dish. This combination results in a savory experience perfect for enhancing Pakistani meals. Each bite delivers a burst of flavor that warms the soul.

Health Benefits of Peshawii Mushrooms

Peshawii mushrooms not only taste great but also offer numerous health benefits. Rich in vitamins, they support immune health and provide essential nutrients. Including mushrooms in your diet promotes well-being, making them an excellent choice for a healthy vegetarian dish.

How to Enjoy the Peshawii Mushrooms

These mushrooms are incredibly versatile and can be served in various ways. Enjoy them as a side dish, mixed with rice, or as a filling in wraps or tacos. Their adaptability allows Peshawii mushrooms to shine in both casual meals and festive occasions.

For a delicious twist on Peshawii mushrooms, check out this Peshawari broth recipe with mushrooms and fish!

A flavorful serving of Peshawii in a colorful dish, garnished with fresh herbs and spices, showcasing the essence of Pakistani cuisine

Discover the savory world of Peshawii mushrooms—a delicious dish for every occasion!

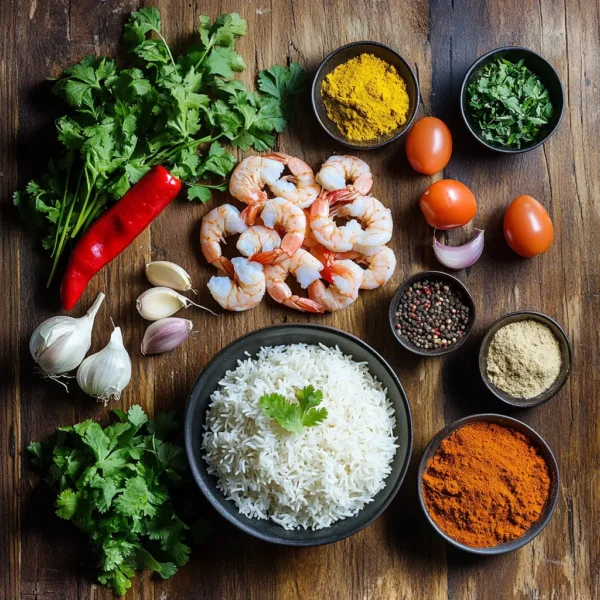
Key Ingredients for Authentic Peshawii Mushrooms

Creating authentic Peshawii mushrooms requires high-quality ingredients to achieve the dish’s signature flavor and texture. Understanding these key ingredients is essential for a delicious and satisfying result.

1. Fresh Mushrooms

The primary component in Peshawii mushrooms is fresh mushrooms. Varieties such as button mushrooms or shiitake are commonly used. Fresh mushrooms provide an earthy base, absorbing spices beautifully during cooking. This ensures a delightful texture and flavor that defines authentic Peshawii mushrooms.

2. Aromatic Spices

Aromatic spices like cumin, coriander, and chili powder are essential for enhancing the dish. These spices impart warmth and depth to the flavor profile. Using whole spices and grinding them fresh can elevate the taste even further. Balanced seasoning is crucial to achieving that authentic Pakistani cuisine experience.

3. Garlic and Ginger

Fresh garlic and ginger are vital to the savory base. These aromatics bring a pungent and zesty kick that complements the mushrooms perfectly. Minced garlic and grated ginger allow their flavors to infuse into the dish. Together, they create a harmonious blend of tastes in Peshawii mushroom preparations.

4. Fresh Herbs

Fresh herbs, such as cilantro and green chilies, add a vibrant touch to the dish. Cilantro enhances the flavor and provides a pop of color. Chopped green chilies can be adjusted for spice, catering to individual preferences. Using fresh herbs makes the dish visually appealing and adds brightness to each bite.

A colorful arrangement of key ingredients for authentic recipe , including fresh mushrooms, aromatic spices, garlic, ginger, and fresh herbs.

Discover the savory world of Peshawii mushrooms—a delicious dish for every occasion!

Cooking Instructions for Peshawii Mushrooms

Cooking Peshawii mushrooms is a straightforward process that maximizes flavor and texture. Follow these simple steps to create a delicious dish that celebrates the essence of Pakistani cuisine.

1. Prepare the Ingredients

Begin by gathering all your key ingredients for this special recipe. This includes fresh mushrooms, aromatics like onions and garlic, and your favorite spices. Having everything ready ensures a smooth cooking process. Chop the onions and mince the garlic to enhance their flavors during cooking.

2. Sauté the Aromatics

In a large skillet, heat a bit of oil over medium heat. Add the chopped onions and sauté until they become translucent and fragrant. Then, incorporate the minced garlic and cook for another minute. This step releases delicious aromas that form a flavorful base for the dish.

3. Cook the Peshawii Mushrooms

Next, add the fresh mushrooms to the skillet. Stir them well to coat with the sautéed mixture. Season with cumin, coriander, and chili powder, stirring frequently. Allow the mushrooms to cook until they are tender and have released their moisture. This step intensifies the flavors of the Peshawii.

4. Simmer and Blend Flavors

Add a splash of water if necessary to prevent sticking, allowing the spices to meld. Simmer for a few minutes to intensify the flavors and finish cooking. Taste and adjust the seasoning as needed, adding salt, pepper, or more spices. This ensures each bite of Peshawii mushrooms is bursting with flavor! 👩‍🍳

5. Serve Hot

Once your Peshawii mushrooms are perfectly cooked, transfer them to a serving dish. Garnish with fresh herbs like cilantro and serve alongside naan or rice. Enjoy this delicious dish that brings a taste of tradition to your table! 🎉

A skillet filled with sautéed recipe, garlic, and onions, bubbling with spices, ready to be served.

Discover the savory world of Peshawii mushrooms—a delicious dish for every occasion!

Common Mistakes to Avoid When Making Peshawii Mushrooms

Making delicious Peshawii can be simple, but certain mistakes can hinder your success. Being aware of these common pitfalls will ensure a flavorful dish every time.

1. Using the Wrong Peshawii Mushrooms Varieties

Choosing the wrong type of mushrooms can lead to undesirable texture and flavor. Opt for firm varieties like button or shiitake. These mushrooms hold up better during cooking, ensuring your Peshawii mushrooms have the right heartiness. Avoid using overripe or waterlogged mushrooms, as these can affect the overall taste.

2. Overcooking the Ingredients

Overcooking mushrooms can result in a mushy texture that detracts from the dish. Pay attention to cooking times to maintain the right consistency. Ideally, you want your mushrooms tender but not falling apart. Stirring occasionally helps achieve a perfectly sauteed mix, enhancing the flavors without compromising texture.

3. Skipping Seasoning

Failing to properly season the dish is a common mistake. Be generous with your spices, as they are what make Peshawii flavorful. Cumin, coriander, and chili powder should be used liberally to deepen the taste. Always taste as you go to ensure the seasoning is just right.

4. Not Preparing the Base Properly

Neglecting the sautéed onions and garlic can result in a flat flavor profile. These ingredients create a savory foundation for the Peshawii. Sauté them until fragrant and translucent to build a robust flavor profile. Properly prepared aromatics elevate the entire dish, making each bite satisfying.

A skillet showing Peshawii  being cooked, with vibrant colors showcasing fresh ingredients. Include labels of common mistakes like overcooked mushrooms or lack of seasoning.

Discover the savory world of Peshawii mushrooms—a delicious dish for every occasion!

Chef’s Note

When preparing this fantasctic recipe, focus on using the freshest ingredients for the best flavor. Fresh mushrooms, such as button or shiitake, will provide the right texture and taste, making each bite a delight. Always remember to wash your mushrooms just before cooking to retain their moisture and flavor.

Timing is critical in ensuring your dish reaches the perfect consistency. Cooking the onions and garlic to a fragrant golden hue creates a robust base for the mushrooms. Avoid the temptation to rush this process, as it sets the tone for the entire dish.

Don’t skimp on spices! The magic of Peshawii mushrooms lies in their seasonings. Experiment with spices like cumin and coriander to find your ideal flavor balance. Feel free to adjust the heat level by adding fresh green chilies if you prefer a spicier kick.

Lastly, enjoy the artistry of cooking. This dish is not only a dish to savor but also a celebration of culture and flavor. Take your time, have fun with it, and remember that cooking is as much about the journey as it is about the result. Happy cooking!

Jan 25, 2025 by Gastronome Recipes

Irresistible 5-Minute Molten Chocolate Mug Cake Recipe

A warm molten recipe in a rustic mug, topped with a scoop of vanilla ice cream and drizzled with chocolate syrup.

Master the art of baking with these essential tips for the perfect chocolate lava cake !

A molten chocolate mug cake is the ultimate indulgence for chocolate lovers. This quick and easy dessert combines convenience with rich flavor, perfect for satisfying late-night cravings. With just a few simple ingredients, you can create a decadent treat in minutes. This dessert offers a warm, gooey center that melts in your mouth, making it a favorite for all ages. Whether enjoyed solo or shared with friends, a mug cake elevates any occasion into something special.

The Joy of Comfort Food

There’s something magical about a warm, homemade dessert straight from the microwave. The delightful aroma of melting chocolate fills the air, creating an inviting atmosphere in your kitchen. Each bite delivers comfort and sweetness, reminding you of the joys of baking. It’s an experience that brings warmth and happiness, making this mug cake a must-try recipe for dessert enthusiasts.

Perfect for Any Occasion

No matter the occasion, a molten chocolate mug cake recipe can fit in perfectly. From casual movie nights to special celebrations, this quick dessert is sure to impress. Its individual serving size makes it convenient for guests or a solo treat. Plus, you can personalize the flavors and toppings to suit everyone’s tastes, ensuring a delightful experience every time.

What is a Molten Chocolate Mug Cake?

A molten chocolate mug cake is a delicious dessert that combines simplicity and indulgence. This individual-sized cake is made quickly in a microwave, perfect for satisfying chocolate cravings. With its rich, gooey center and soft texture, it delivers a comforting treat in just minutes. The concept of a mug cake allows everyone to enjoy a warm dessert without any complex preparation.

The Appeal of the Molten Center

What sets the molten chocolate mug cake apart is its signature molten center. When you take a forkful, warm chocolate oozes out, creating a delightful contrast with the cake’s soft outer layer. This indulgent feature makes it irresistibly delicious and the perfect treat for chocolate enthusiasts. The combination of flavors and textures elevates this dessert to a favorite for many.

Perfect for Any Occasion

The versatility of molten chocolate mug cakes makes them ideal for various occasions. Whether it’s a cozy night in, a quick dessert for guests, or a late-night snack, this recipe fits perfectly. You can customize the cake with different toppings, such as whipped cream or berries, to suit individual tastes. For a richer flavor, consider adding nuts or flavored chocolate for an exciting twist.

For a delightful treat, check out this delicious vanilla mug cake recipe!

A warm molten recipein a ceramic mug with chocolate oozing from the center, garnished with a scoop of vanilla ice cream.

Master the art of baking with these essential tips for the perfect chocolate lava cake !

Key Ingredients for a Chocolate Mug cake

Creating the perfect mug cake requires the right key ingredients to ensure a rich and delicious experience. Understanding these components will lead to a delightful dessert every time.

1. High-Quality Chocolate

The star ingredient of a molten chocolate mug cake is high-quality chocolate. Choose semisweet or dark chocolate for an indulgent flavor. The chocolate should melt smoothly when mixed with the batter, creating that irresistible molten center. Opting for quality chocolate enhances the overall taste and ensures a rich experience that chocolate lovers will adore.

2. All-Purpose Flour

All-purpose flour is essential for providing structure in your mug cake. It creates a tender crumb that complements the chocolate beautifully. Be cautious with the amount; using too much can lead to a dense cake. The flour works in conjunction with other ingredients to ensure your cake remains light and fluffy, making every bite enjoyable.

3. Granulated Sugar

Granulated sugar is necessary for sweetness in your mug cake. It enhances the flavor of the chocolate while balancing the richness. Sugar also contributes to the cake’s texture, giving it that delightful softness we all crave. Adjusting the sugar level won’t just change sweetness but can impact the overall moistness of your cake.

4. Eggs

Eggs are crucial for binding the ingredients and providing moisture. They also help the cake rise during baking, giving it that fluffy texture. Using large eggs ensures that your batter achieves the right consistency. The proteins in eggs contribute to the cake’s structure, ensuring you have a delicious end product.

A collection of key ingredients for a mug cake: high-quality chocolate, all-purpose flour, granulated sugar, and eggs, displayed on a kitchen countertop.

Master the art of baking with these essential tips for the perfect chocolate lava cake !

How to Make an Easy Molten Chocolate Mug Cake

Creating a delicious molten chocolate mug cake recipe is incredibly simple and perfect for any occasion. This quick dessert satisfies chocolate cravings in minutes, making it a favorite for many sweet-toothed individuals.

1. Gather Your Ingredients of Chocolate Mug Cake

Start by gathering all your key ingredients to ensure a smooth process. For the best results, use high-quality chocolate, butter, sugar, eggs, and flour. Having everything ready makes it easy to execute the recipe quickly. Don’t forget to grab a microwave-safe mug for baking your delightful treat!

2. Combine Ingredients Carefully

In your mug, combine the dry ingredients: flour, sugar, and cocoa powder. Next, add melted butter and an egg, mixing until smooth. Stir gently to avoid lumps and ensure everything is evenly incorporated. Adding a splash of vanilla extract can enhance the flavor, making this molten chocolate treat even more delectable.

3. Add Chocolate for the Molten Center

For that irresistible molten center, add chocolate chips or a small piece of chocolate into the mixture. This step is crucial for achieving the gooey texture that defines a good mug cake. Ensure that chocolate is evenly distributed in the batter so that it melts perfectly during baking.

4. Microwave and Enjoy Chocolate Mug cake

Microwave your mug cake for about 40-60 seconds. Keep a close eye to prevent overcooking, which will spoil the ooey-gooey texture. Let it cool for a minute, and then dig in! Enjoy your molten chocolate mug cake with whipped cream or a scoop of ice cream on top for extra indulgence.

A microwave-safe mug filled with molten recipe, topped with a scoop of whipped cream and drizzled with chocolate syrup.

Master the art of baking with these essential tips for the perfect chocolate lava cake !

Variations and Customizations for Chocolate Mug cake

The beauty of a molten chocolate mug cake lies in its versatility. With simple modifications, you can customize this delicious dessert to suit your preferences or seasonal ingredients. Here are some creative variations to consider!

1. Flavor Additions of Chocolate Mug cake

Add a personal touch by incorporating different flavors. A tablespoon of espresso can enhance the chocolate’s richness. Alternatively, try adding peanut butter for a creamy twist or a splash of vanilla extract for added depth. Experimenting with flavors allows you to create a unique cake every time!

2. Mix-Ins for Texture

Mix-ins can take your molten chocolate mug cake recipe to the next level. Consider adding chocolate chips, chopped nuts, or even pieces of your favorite candy bar for extra texture and flavor. These additions not only make the cake more decadent but also offer delightful surprises in each bite.

3. Toppings for Extra Indulgence

Toppings are an excellent way to enhance presentation and taste. After baking, try drizzling the cake with caramel or chocolate syrup. A dollop of whipped cream or a scoop of ice cream adds a luxurious touch to your dessert. Don’t forget to sprinkle some shredded coconut or nuts for added crunch!

4. Alternative Ingredients for Chocolate Mug cake

For those with dietary restrictions, consider alternative ingredients. Use gluten-free flour or nut butters for a gluten-free version. Dairy-free chocolate and non-dairy milk can make this mug cake suitable for vegan diets. These alternatives ensure everyone can enjoy this quick treat.

A variety of molten chocolate recipe with different toppings, including whipped cream, chocolate drizzle, nuts, and vibrant fruit garnishes.

Master the art of baking with these essential tips for the perfect chocolate lava cake !

Common Mistakes to Avoid when making Chocolate Mug Cake

Creating the perfect molten chocolate mug cake can be easy, but avoiding common pitfalls is essential for delicious results. Here are some mistakes to watch out for when making this sweet treat.

1. Overcooking the Chocolate Mug cake

One of the most frequent mistakes is overcooking the mug cake in the microwave. Even a few extra seconds can turn a gooey delight into a dry dessert. Always start with the minimum cooking time, checking for that perfect, molten center. Use a toothpick to ensure it’s just right—moist but not liquid.

2. Not Greasing the Mug

Neglecting to grease your mug properly can lead to sticking. If the cake is difficult to remove, the presentation suffers. Use butter or cooking spray generously to coat the mug before pouring in your batter. This step ensures easy removal and keeps the cake intact, making it visually appealing.

3. Using Cold Ingredients

Another common mistake is using cold ingredients directly from the fridge. For the best texture, let your butter and eggs reach room temperature before mixing. This allows for better mixing and a smoother batter. Consistency in the batter is crucial for achieving that light and fluffy melt-in-your-mouth experience.

4. Skipping Flavor Enhancements

Failing to add flavor enhancements can leave your mug cake bland. Simple ingredients such as vanilla extract or a pinch of salt can elevate your cake’s overall taste. Experimenting with additional flavors like espresso or peppermint extract can make a significant impact. Don’t underestimate the power of small enhancements in your recipe!

5. Ignoring the Right Mug Size

Using a mug that’s too small can lead to overflowing as the cake rises during cooking. Ensure you choose a microwave-safe mug that holds at least 12 ounces. This prevents messes and ensures even baking, making your molten chocolate mug cake an enjoyable experience.

By being aware of these common mistakes, you can ensure a successful outcome with your molten chocolate mug cake every time. Enjoy the process and the delicious chocolatey results!

Chef’s Note

Creating the perfect molten chocolate mug cake recipe is all about precision and balance. Start with high-quality chocolate; it truly makes a difference in flavor. As you prepare your ingredients, ensure that your butter and eggs are at room temperature. This step helps achieve a smooth batter that bakes evenly.

When mixing the ingredients, don’t overmix; doing so can lead to a dense cake rather than a light and fluffy one. Remember, the secret to a great molten center is baking for the right amount of time. Keep a close watch during the last few seconds, as microwave power varies, and an extra moment can impact your results significantly.

Feel free to experiment with flavors! Adding a dash of espresso powder or orange zest can enhance the chocolate’s richness. And don’t skip the toppings: a scoop of vanilla ice cream or a dollop of whipped cream can elevate your dessert to new heights.

Enjoy the process of baking this delightful treat. Each time you make it, you’ll enhance your skills and discover new variations. Happy baking, and indulge in every chocolatey bite! 🍫🥄

By: Gastronome Recipes, January 24, 2025

Irresistible Apple Desserts : Craft the Perfect Topping Every Time

A freshly baked apple crisp topped with a golden, crumbly oat topping, served in a rustic ceramic dish.

Apple desserts Overview

Apple Desserts is a beloved dessert that combines warm fruit with a crispy topping, making it a quintessential comfort food. This classic apple dessert recipe dish is perfect for fall and winter gatherings, providing warmth and satisfaction. The blend of sweet apples and crunchy oats creates an indulgent experience for your taste buds. Whether served warm with ice cream or cold for breakfast, apple dessert recipes never disappoint. It’s a staple recipe that many families cherish and enjoy together.

The Joy of Baking Apple Desserts

Baking apple dessert recipes brings joy and warmth to any kitchen. The delightful aroma of cinnamon and apples fills the air during the preparation of this classic dessert. Everyone loves the nostalgic feeling that apple dessert recipes inspire, making them a must-try for all dessert lovers. From mixing the ingredients to enjoying the final result, each step in making apple dessert recipes is a delightful experience.

A Versatile Treat

The beauty of apple dessert recipes lies in their versatility. You can easily customize your apple dessert recipe with different fruits or toppings to suit your taste. This adaptability makes it suitable for any occasion, from holiday feasts to casual gatherings. This dessert not only satisfies your sweet tooth but also delights your guests, showcasing the wonderful possibilities of apple dessert recipe creations.

What is Apple Desserts ?

Apple dessert recipes are classic desserts that combine baked apples with a delicious crispy topping. This beloved dish is known for its comforting flavors and easy preparation. Traditionally associated with fall, apple dessert recipes showcase seasonal apples, making it a perfect treat for cozy gatherings.

The Classic Combination

The classic combination of tender apples and crunchy oat topping defines apple dessert recipes. Sweet and tart apples are sliced and mixed with sugar and spices. This delicious filling is then covered with a mixture of oats, flour, brown sugar, and butter, creating a textural contrast.

Rich History of Apple Desserts

Apple dessert recipes have a rich history in American cuisine, often linked to traditional family recipes. Their origins date back to World War II, where resourcefulness led to the creation of this delightful dish. As a classic comfort food, apple dessert recipes have been passed down through generations and remain popular today.

Versatile Variations

While apple is the star ingredient, apple dessert recipes are incredibly versatile. You can customize them by adding other fruits like berries or peaches. Additionally, experimenting with spices and toppings allows for endless variations. This adaptability makes apple dessert recipes a favorite for any occasion.

For a delightful twist on traditional apple desserts, be sure to check out this delicious French apple cake recipe!

A serving of apple crisp, showcasing its golden oat topping and warm, tender apple filling, garnished with a scoop of vanilla ice cream.

Key Ingredients for Apple desserts

Apple dessert recipes are delightful treats that come to life through their simple yet flavorful ingredients. Understanding these key ingredients is essential for creating the perfect apple dessert recipe at home.

1. Fresh Apples

The star of any apple dessert recipe is, of course, fresh apples. Apples provide the sweetness and tartness that balance the dish. Varieties like Granny Smith or Honeycrisp work best due to their firm texture. Choose ripe and seasonal apples for maximum flavor in your apple dessert recipes. When baked, the apples become tender and deliciously fragrant, adding richness to the overall dessert.

2. Oats

Oats are crucial for creating the crunchy topping that defines apple dessert recipes. Rolled oats add texture and heartiness to the dish, making it extra satisfying. They absorb flavors from the butter and spices, enhancing the overall enjoyment of the dish. Choose old-fashioned rolled oats for the best texture; quick oats may become too mushy during baking, affecting your apple dessert recipe.

3. Flour

Flour is an important component of the topping mixture in an apple dessert recipe. It helps bind the other ingredients together and adds structure to the topping. All-purpose flour is commonly used, but you can experiment with alternatives, such as whole wheat or gluten-free flour. The right amount of flour ensures a balanced topping that perfectly complements the apples in your apple dessert recipes.

4. Brown Sugar

Brown sugar is essential for adding sweetness and depth to apple dessert recipes. It enhances the caramelization of the topping and gives it a delightful flavor. The molasses in brown sugar provides a rich, syrupy texture that pairs beautifully with the tender baked apples. You can adjust the amount based on your desired sweetness level, ensuring the perfect balance in your apple dessert recipe.

A collection of key ingredients for apple crisp: fresh apples, rolled oats, brown sugar, flour, and butter, beautifully arranged on a wooden countertop.

How to Make the Perfect Topping for Apple desserts

Creating the perfect topping for your apple crisp is essential for enhancing flavor and texture. With the right ingredients and techniques, you can achieve a crunchy, sweet topping that perfectly complements the baked apples.

1. Combine the Right Ingredients

Start by combining rolled oats, flour, brown sugar, and a pinch of salt in a mixing bowl. These ingredients provide texture and a sweet, comforting flavor. Ensure even distribution by mixing thoroughly for optimal flavor in every bite.

2. Add Butter for Richness

Cut cold unsalted butter into small cubes and add it to the dry ingredients. Using your fingers or a pastry cutter, work the butter into the mixture until it resembles coarse crumbs. Butter is crucial for adding richness and moisture to the topping, making it decadent and satisfying.

3. Customize with Spices and Nuts

For extra flavor, consider adding cinnamon, nutmeg, or chopped nuts to the topping mixture. Spices elevate the overall taste and aroma of the topping, while nuts offer a delightful crunch. Experiment with different combinations to find your favorite version.

4. Bake to Perfection

Spread the topping evenly over the prepared apple filling and bake until golden brown and crisp. Taking care not to overbake ensures a delightful contrast between the tender apples and crunchy topping. Perfect timing will make all the difference in achieving that iconic apple crisp experience.

A mixing bowl filled with the perfect apple crisp topping ingredients: rolled oats, flour, brown sugar, and cold butter, with spices sprinkled in.

Step-by-Step Apple desserts

Making an irresistible apple crisp is easier than you think! Follow this step-by-step guide to create a warm, comforting dessert.

1. Gather Your Ingredients

Before you start, gather all essential ingredients: fresh apples, oats, flour, sugar, and spices. Preparing everything ahead ensures a smooth cooking experience. Organizing your ingredients keeps you on track while making the recipe easier.

2. Prepare the Apples

Begin by washing, peeling, and slicing the apples into thin wedges. Toss the apple slices with sugar, cinnamon, and a bit of flour. This step enhances flavor and helps release juices during baking, resulting in a deliciously sweet filling.

3. Make the Topping

In a mixing bowl, combine rolled oats, flour, brown sugar, and a pinch of salt. Cut in cold butter until the mixture resembles coarse crumbs. This mixture creates a perfectly crunchy topping that contrasts beautifully with tender apples.

4. Assemble and Bake

In a greased baking dish, layer the prepared apples evenly, then sprinkle the topping over the fruit. Bake in a preheated oven at 350°F (175°C) for about 30-40 minutes. The topping should be golden brown, and the apples bubbly for an appealing presentation.

5. Serve and Enjoy

Once baked, let the apple crisp cool for a few minutes. Serve warm with a scoop of ice cream or a dollop of whipped cream. This classic dessert pleases everyone and highlights the beauty of simplicity.

A step-by-step layout of making apple crisp, showcasing fresh sliced apples, bowls of dry topping ingredients, and a baking dish with assembled layers.

Common Mistakes to Avoid when making Apple Desserts

Creating the perfect apple dessert recipe involves avoiding common pitfalls that can impact flavor and texture. Being aware of these mistakes ensures a delicious outcome every time.

1. Overbaking the Apple Desserts

One of the most frequent mistakes is overbaking the apple dessert recipe. This leads to a dry topping instead of a golden, crunchy layer. Follow the baking time closely to ensure perfect results. Check for a bubbly filling, signaling that it’s ready!

2. Choosing the Wrong Apples

Using the wrong varieties can ruin your apple dessert recipe. Soft apples like Red Delicious become mushy. Opt for firm apples like Granny Smith or Honeycrisp for the best texture. These apples hold up beautifully during baking, enhancing overall flavor.

3. Failing to Season Properly

Neglecting seasonings can result in bland apple dessert recipe. Sugar, cinnamon, and nutmeg elevate flavors significantly. Don’t skip the spices, as they add warmth and richness to the dish. Proper seasoning creates a delightful balance with the sweetness of the apples.

4. Not Preparing the Topping Correctly

Overmixing the topping is a common mistake that affects texture. The mixture should resemble coarse crumbs, providing that desirable crunch. Avoid using melted butter; cold butter ensures a flaky and crispy topping that everyone loves

A visual representation of common mistakes to avoid when making apple crisp,

Chef’s Note

When making apple dessert recipe, attention to detail is essential for achieving the perfect dessert. Start by using fresh, high-quality apples like Granny Smith or Honeycrisp for the best flavor and texture. Make sure to adjust the sugar levels based on the tartness of the apples you choose; sweeter apples may require less sugar, just as you would adjust sugar in an apple dessert recipe.

The crispy topping is just as important as the apple filling, similar to the balance found in a delicious apple cake. Using cold butter helps create that much-desired crunchy texture, so avoid melting it beforehand. Experiment with different spices such as cinnamon and nutmeg to enhance the warmth of this dish, and don’t forget to add a pinch of salt to balance the sweetness.

Lastly, serving your apple crisp warm with a scoop of rich vanilla ice cream or a dollop of whipped cream elevates the experience, much like how a wonderful topping complements an apple cake. Not only does it create a delightful contrast of temperatures, but it also adds a creamy richness that complements the tender apples and crunchy topping.

Enjoy the baking process, and remember, each attempt helps you perfect this classic recipe that your family and friends will love! Whether you’re making apple crisp or apple cake, happy baking! 🍏🥧

By: Gastronome Recipes, January 24, 2025

Chocolate Lava Cake: How to Make the Perfect Molten Dessert

Chocolate lava cake with a molten center, garnished with powdered sugar and served with vanilla ice cream.

Discover the delicious world of chocolate lava cake, where rich chocolate meets molten perfection!

Chocolate lava cake is the ultimate indulgence for dessert lovers. This rich, molten chocolate dessert captivates with its warm, gooey center and velvety texture. Perfect for any occasion, this delectable treat impresses guests and satisfies even the strongest chocolate cravings.

Decadence in Every Bite

Each bite offers a burst of intense chocolate flavor that melts in your mouth. The contrast of warm molten cake and cold vanilla ice cream is truly irresistible and creates a memorable experience. Chocolate lava cake is an indulgent dessert that delights the senses and leaves everyone craving more.

The Perfect Dessert for Any Occasion

Whether it’s a romantic dinner, a festive celebration, or a family gathering, this dessert is crowd-pleasing and universally loved. Its elegant presentation makes it a showstopper at parties, weddings, and special events. Surprise your loved ones with this delightful treat that elevates any meal into something extraordinary.

Quick and Easy to Make chocolate lava cake

With just a few simple, high-quality ingredients, you can create magic in your kitchen. In under 30 minutes, enjoy homemade chocolate delight that rivals restaurant-quality desserts. The uncomplicated recipe guarantees delicious results every time, making it perfect for both novice and experienced bakers.

What is Chocolate Lava Cake?

Chocolate lava cake is a beloved dessert that features a warm, gooey center. This decadent treat combines the best of cake and molten chocolate. The contrast between the outer cake and the flowing chocolate interior is simply irresistible.

A Delicious Chocolate Creation

Originating from French cuisine, chocolate lava cake delights with its rich cocoa flavor. This dessert has become a favorite in restaurants worldwide. Its popularity stems from its satisfying texture and intense taste.

The Perfect Dessert Experience of chocolate lava cake

When you cut into a chocolate lava cake, a river of molten chocolate flows out. It’s a delightful surprise that keeps dessert lovers coming back for more. This sensory experience elevates any dining occasion.

Simple yet Elegant

Despite its gourmet appearance, lava cake is surprisingly easy to make. With just a handful of ingredients, anyone can recreate this masterpiece at home. It serves as an impressive dessert for dinner parties or celebrations.

For an amazing chocolate lava cake recipe that’s sure to impress, check out this delicious lava cake recipe!

Warm chocolate lava cake with molten center, garnished with powdered sugar and served with vanilla ice cream.

Discover the delicious world of chocolate lava cake, where rich chocolate meets molten perfection!

Key Ingredients for a Perfect Lava Cake

Creating the ultimate chocolate lava cake starts with using the right key ingredients. Each component is vital for achieving a luscious, molten texture and rich, indulgent flavor. Here’s a closer look at the essential ingredients that make this dessert truly decadent.

1. High-Quality Chocolate

Using high-quality chocolate is crucial for achieving a deep, rich flavor in your chocolate lava cake. Opt for semisweet or dark chocolate to enhance the overall taste and create that signature molten center. A good chocolate will melt smoothly, ensuring a luxurious texture. Avoid low-quality chocolate, as it may lead to a less satisfying and disappointing dessert experience.

2. Unsalted Butter

Unsalted butter is essential for adding richness to the cake, contributing to its creamy texture and decadent flavor. It helps achieve the perfect balance of richness without any extra saltiness. Using butter at room temperature ensures it blends smoothly with other ingredients, resulting in a luscious, cohesive batter that rises beautifully in the oven.

3. Fresh Eggs

Fresh eggs are a key ingredient for the structure and delightful texture of the lava cake. They help bind the ingredients together, providing necessary stability during baking. The egg proteins also play a crucial role in creating the characteristic gooey and molten center that makes chocolate lava cake so irresistible and indulgent.

4. All-Purpose Flour

All-purpose flour serves as the backbone of the chocolate lava cake, providing necessary structure while keeping it light and tender. Just the right amount ensures that the cake has a perfect crumb without being overly dense. Be sure to avoid overmixing the batter; this maintains the delicate texture that melts in your mouth, enhancing the overall dessert experience.

Each of these key ingredients plays a significant role in creating a decadent chocolate lava cake. By focusing on quality and precision, you can ensure that every bite delivers an unforgettable heavenly experience. Enjoy the perfect combination of flavors and textures with each delicious serving of this molten delight!

Ingredients for chocolate lava cake : semisweet chocolate, unsalted butter, fresh eggs, flour, and vanilla extract.

Discover the delicious world of chocolate lava cake, where rich chocolate meets molten perfection!

Tips for Perfecting Your Chocolate Lava Cake

Creating the perfect lava cake requires finesse and attention to detail. Here are essential tips that will help ensure your dessert turns out flawlessly every time.

1. Use Quality Ingredients

Start with high-quality ingredients to achieve the best chocolate lava cake flavor. Fresh chocolate, premium butter, and farm-fresh eggs make a noticeable difference in taste. Don’t skimp on the chocolate; after all, it’s the star of the show! Quality ingredients can elevate your dessert to gourmet status.

2. Don’t Overbake for Molten Perfection

Timing is crucial for achieving that desirable gooey center in your chocolate lava cake. Bake just until the edges set, while the center remains slightly jiggly. A few minutes can make a significant difference between a heavenly molten cake and a disappointing dry one. Perfect baking time is key!

3. Invest in Ramekins for Control

Using individual ramekins not only helps control baking time but also ensures each cake gets equal attention. Ensure your ramekins are greased well to allow for easy removal after baking. Ramekins enhance the presentation, making your lava cake look elegant and appealing on the plate.

4. Let it Rest for the Best Texture

Allow the cakes to rest for a minute after baking before serving. This critical step helps firm up the edges while, simultaneously, keeping the center molten and oozy. Serving immediately will provide the perfect contrast of warm cake and cold ice cream, creating a divine dessert experience.

These tips will elevate your chocolate lava cake, ensuring a delectable result that is bound to impress friends and family. With a little practice and proper techniques, you can master this indulgent dessert and become a baking sensation!

Perfectly baked chocolate lava cakes in ramekins, with molten centers oozing out and garnished with powdered sugar.

Discover the delicious world of chocolate lava cake, where rich chocolate meets molten perfection!

Common Mistakes to Avoid When Making Chocolate Lava Cake

When making chocolate lava cake, there are several common mistakes that can hinder your success. Being aware of these pitfalls will help you achieve the perfect dessert every time.

1. Overbaking Your chocolate lava cake

One of the most frequent mistakes is overbaking your chocolate lava cakes. This leads to a consistent firm texture rather than a gooey, molten center. Follow the recommended baking time strictly and check for that slight jiggle in the middle to achieve the ideal lava effect.

2. Skipping Quality Ingredients

Another common mistake is skipping quality ingredients. Using low-quality chocolate or butter can seriously compromise the rich flavor of your dessert. It’s essential to invest in high-quality chocolate and fresh unsalted butter for the best results. Always remember, good ingredients yield the finest outcomes.

3. Not Prepping Ramekins Properly

Not prepping your ramekins properly is also a major error. Failing to grease your ramekins can result in sticking, making removal difficult. Be generous with butter or cooking spray, ensuring easy removal after baking. Proper preparation is key to achieving beautiful presentation and optimal texture.

4. Ignoring Ingredient Temperature

Lastly, ignore ingredient temperature at your own risk. Baking with cold ingredients can negatively affect your cakes’ rise and overall texture. Always use room temperature eggs and butter for even mixing. Warm ingredients will enhance the batter consistency and contribute to the dessert’s final quality.

By avoiding these common mistakes, you can enjoy a flawlessly executed chocolate lava cake that impresses every time. Master these tips to ensure your dessert is rich, gooey, and absolutely delicious!

Recipe with a molten center, garnished with powdered sugar and served with vanilla ice cream.

Discover the delicious world of chocolate lava cake, where rich chocolate meets molten perfection!

Chef’s Note

When diving into the delicious world of lava cake, precision and attention to detail are absolutely essential. Begin by carefully measuring all your ingredients—accuracy can make a significant difference in the final texture and flavor of your molten dessert. Follow the baking times explicitly, as even a minute can turn a molten delight into a cake with a firm center.

It’s also important to preheat your oven; consequently, baking in an adequately heated environment ensures even cooking throughout the cake. Furthermore, remember that every oven is different, so you should consider doing a test run if you’re new to this decadent dessert.

Don’t shy away from personalizing your lava cake experience! Consider adding a hint of espresso or orange zest to elevate the flavors and surprise your taste buds. If you’re adventurous, experiment with fillings like peanut butter or flavored chocolate bars for a unique twist that will impress your guests.

Presentation is key too! Serve your lava cake with a scoop of vanilla ice cream or a dollop of whipped cream to create an inviting contrast to the rich, warm chocolate. Garnishing with fresh berries or a dusting of powdered sugar can visually enhance the dish, making it a feast for the eyes as much as the palate.

Enjoy the process of baking; each attempt brings you closer to perfection. And remember, the joy of cooking is not just about the result, but also about the journey. Savor the delicious results, share them with loved ones, and create wonderful memories together in the kitchen.

By: Gastronome Recipes, January 24, 2025

Quick and Easy Acini di Pepe Soup Recipes

Explore delicious and simple recipes for acini di pepe soup, from creamy variations to hearty meat options !

Acini di Pepe soup is a delicious and comforting dish that has captured the hearts of many home cooks and food enthusiasts alike. This delightful soup features small, round pasta, acini di pepe, that resembles tiny pearls, making it a perfect addition to a variety of recipes. Known for its versatility, acini di pepe can be combined with a multitude of ingredients, allowing for endless creative possibilities. Whether you’re looking for a quick weeknight meal or a cozy dish for a gathering, it offers a rich, satisfying experience that warms both the heart and palate.

Making acini di pepe soup is simple and a great way to incorporate nutritious ingredients into your diet. Depending on personal preferences, this dish can be crafted in many ways, from creamy variations enriched with dairy to hearty acini di pepe options that include protein-rich meats or vibrant vegetables. The soup is typically flavored with broth—chicken, beef, or vegetable—which enhances the overall taste and brings delightful depth to the acini di pepe soup.

Incorporating fresh herbs and seasonings further elevates the flavor of acini di pepe soup, making each serving a celebration of taste. As you delve into this blog post, you will discover quick and easy recipes for acini di pepe soup that cater to different dietary preferences and occasions. Get ready to embark on a delicious culinary adventure that promises to make acini di pepe a staple in your kitchen!

What is Acini di Pepe Pasta ?

Acini di Pepe pasta is a unique and delightful small pasta variety that originates from Italy. The name “acini di pepe” translates to “seeds of pepper,” aptly describing its petite, round shape that resembles tiny pearls or grains. This pasta is typically made from durum wheat semolina, which gives it a firm texture and excellent cooking quality. Acini di Pepe is often used in soups, salads, and even baked dishes, making it a versatile ingredient that can seamlessly fit into a variety of recipes.

One of the standout qualities of acini di pepe is its ability to absorb flavors while still retaining its structure after cooking. This characteristic makes it particularly popular for dishes like soup, where it effectively soaks up the broth, enhancing each bite with rich taste. When cooked properly, acini di pepe delivers a delightful chewiness that complements other ingredients, such as vegetables, meats, and seasonings.

In addition to its texture and flavor, acini di pepe pasta is a nutritious option. It is low in fat and provides a good source of carbohydrates, making it an ideal choice for a hearty meal. Furthermore, it can be easily incorporated into both vegetarian and meat-based dishes, offering flexibility for various dietary preferences. Understanding what acini di pepe pasta is and how to use it will undoubtedly enrich your culinary repertoire.

Acini di pepe pasta are small, round pasta shapes that resemble tiny grains or beads. They are often used in soups and salads, adding texture and heartiness to dishes. To learn more about acini di pepe and its uses, check out this informative article on :

Beef, Tomato, and Acini di Pepe Soup Recipe

Explore delicious and simple recipes for acini di pepe soup, from creamy variations to hearty meat options !

Key Ingredients for Acini di Pepe Soup

When preparing a delicious bowl of pepe soup, the choice of key ingredients is essential to achieving a rich and flavorful dish. The star of the recipe is, of course, the acini di pepe pasta. This small, round pasta absorbs the flavors of the broth and contributes a delightful texture that makes the soup satisfying. Whether you’re using it in a creamy soup, a hearty vegetable mix, or a meat-based broth, acini di pepe provides a unique chew that enhances every spoonful.

Next, the broth serves as the foundation for the soup, delivering depth and warmth to the dish. You can choose between chicken broth, vegetable broth, or beef broth, depending on your flavor preference and dietary needs. A well-seasoned broth sets the tone for the entire recipe, making it crucial to select a quality option, whether homemade or store-bought.

In addition to pasta and broth, fresh vegetables are vital for creating a nutritious and colorful acini di pepe soup. These vegetables not only add essential nutrients but also introduce layers of flavor and texture to the soup.

A blend of seasonings—from herbs like thyme and basil to spices like pepper—rounds out the dish beautifully.

By thoughtfully selecting these key ingredients, you can create a comforting recipe that everyone will enjoy.

By thoughtfully selecting these key ingredients, you can create a comforting and delicious acini di pepe soup that everyone will enjoy.

Explore delicious and simple recipes for acini di pepe soup, from creamy variations to hearty meat options !

Quick and Easy Recipes for Acini di Pepe Soup

This is not only delicious but also incredibly versatile, allowing for various recipes that cater to different tastes and dietary preferences. One popular variation is Creamy Acini di Pepe Soup, which combines the small pasta with a rich and velvety base. To make this soup, start by sautéing onions, garlic, and your choice of vegetables until they are tender. Next, add vegetable broth and bring it to a gentle boil before incorporating the acini di pepe. Finish the soup by stirring in heavy cream or a plant-based alternative for a creamy texture. Season with herbs like thyme and a sprinkle of cheese for added richness. This quick recipe is perfect for a comforting weeknight dinner.

Another fantastic option is the Vegan Pepe Soup. This recipe is simple and packed with nutrition. Begin by heating olive oil in a pot, then add diced tomatoes, carrots, and celery. Once they soften, add vegetable broth and spices like basil and oregano. Toss in the acini di pepe and let it cook until tender. For a pop of nutrition, fold in fresh spinach just before serving. This vegan version is not only easy to prepare but offers a hearty meal that satisfies.

For meat lovers, consider the Beef and Tomato Pepe Soup. Start by browning ground beef in a large pot, season with salt and pepper, and then drain any excess fat. Add diced onions, garlic, and freshly chopped tomatoes, simmering until softened. Pour in beef broth and add the acini di pepe, cooking until tender. This robust soup is perfect for chilly days and is sure to impress family and friends with its savory flavor and hearty ingredients

Explore delicious and simple recipes for acini di pepe soup, from creamy variations to hearty meat options !

Tips for Perfecting


To prevent mushiness, cook acini di pepe separately if storing leftovers, as it absorbs liquid quickly when combined with broth. Instead, cook the pasta al dente and add it to the soup just before serving. This method ensures that the pasta maintains its delightful bite and enhances the overall texture of your dish.

Another key tip is to enhance the flavor of your broth. Simmer homemade or store-bought broth with aromatics like onions, carrots, and fresh herbs for richer flavor. Adjust seasoning as needed.

Lastly, don’t hesitate to experiment with ingredients to elevate your soup. Incorporating seasonal vegetables, beans, or proteins can add layers of flavor and nutrition. Finish with a drizzle of olive oil or top with grated cheese or herbs for brightness and improved presentation. These tips will help you perfect your pepe soup, creating a comforting dish that’s both satisfying and beautiful.

Explore delicious and simple recipes for acini di pepe soup, from creamy variations to hearty meat options !

Chef’s Note

Acini di pepe soup is a versatile and comforting dish, making it a favorite among home cooks everywhere. One of the key aspects of creating a great soup is flavor development. Don’t rush the process! Simmer the broth with aromatics to meld flavors, creating a richer, more robust taste in your dish

When it comes to the pasta, remember that acini di pepe can absorb a considerable amount of liquid. Cook pasta separately for large batches and mix it with soup right before serving to maintain texture.. This technique will keep the pasta perfectly al dente and prevent it from becoming mushy over time.

Additionally, feel free to customize your soup based on what’s in season or what you have on hand. Acini di pepe soup is versatile; you can enhance it with different vegetables, legumes, or proteins for added flavor. Don’t hesitate to experiment with different herbs and spices to suit your taste preferences.

Finally, presentation matters! A drizzle of olive oil or a sprinkle of cheese will elevate your soup’s flavor and presentation. Enjoy!

By: Gastronome Recipes

Master the Art of Perfectly Cooked Snow Crab Legs

Plated snow crab legs garnished with lemon and herbs on a rustic wooden kitchen table.

Explore the culinary delights of snow crab legs and learn how to prepare this exquisite seafood treat

Snow crab legs are a delectable seafood delicacy that offers a unique combination of flavor, texture, and culinary versatility. Sourced from the frigid waters of the North Atlantic and North Pacific, particularly in regions like Alaska, they are known for their sweet, tender meat and striking reddish-orange shells. Cooking snow crab legs is a delightful experience, whether you’re boiling, steaming, or grilling them. Their rich flavor profile and tender texture make them a favorite among seafood enthusiasts and a standout choice for special occasions or family gatherings.

One of the most appealing aspects of snow crab legs is their ease of preparation. These legs are often sold pre-cooked and frozen, so home cooks can quickly bring a gourmet experience to their tables without extensive preparation. With just a few simple cooking methods, such as boiling and steaming, you can achieve perfectly tender crab legs that highlight their natural sweetness. Pairing them with delightful dipping sauces, such as melted garlic butter or zesty lemon sauce, enhances the overall dining experience.

In addition to their exquisite taste, they come with a host of nutritional benefits. They are low in fat and high in protein, offering essential vitamins and minerals that contribute to overall health. Understanding how to select, prepare, and cook snow crab legs will empower you to create a memorable seafood feast that delights family and friends alike, making any meal a special occasion. Whether you’re a seasoned chef or a novice cook, this guide will provide you with everything you need to know about cooking snow crab legs.

What Are Snow Crab Legs ?

They refer to the highly sought-after culinary delicacy harvested from snow crabs, which live in the cold waters of the North Atlantic and North Pacific oceans.
Snow crabs are primarily harvested in cold-water regions, particularly thriving in the icy depths of the Bering Sea and surrounding waters of Alaska and Canada. Recognizable by their elongated, slender legs and striking orange-red exoskeleton, these crustaceans offer a truly delightful culinary experience. The succulent meat found inside the legs boasts a sweet, oceanic taste complemented by a hint of brininess, which has captured the hearts of seafood lovers everywhere. Their tenderness and unique flavor profile make this recipe a sought-after delicacy in many seafood dishes. Understanding the anatomical characteristics of snow crab legs can enhance appreciation for this luxurious seafood option.

In addition to their exquisite taste, they are also a nutritious option for seafood lovers. They are low in fat and high in protein, making them a healthy choice for those looking to incorporate more lean protein into their diets. Packed with essential vitamins and minerals, such as vitamin B12 and zinc, snow crab legs not only satisfy your taste buds but also contribute to your overall well-being, making them a delicious and wholesome addition to any meal.

For an in-depth recipe on cooking, visit this helpful guide :

Check out this guide for cooking snow crab legs!

A cozy kitchen scene with a beautifully arranged plate of snow crab legs, garnished with lemon wedges and herbs, inviting readers to learn about cooking seafood.

Explore the culinary delights of snow crab legs and learn how to prepare this exquisite seafood treat

Key Ingredients for Cooking Snow Crab Legs

When preparing snow crab legs, the most critical ingredient is, of course, the snow crab legs themselves. they are often available in a pre-cooked and frozen state, preserving their rich flavor and delicate texture, making them convenient for home preparation. When selecting this recipe at the store, look for bright, vibrant shells that indicate freshness. Firmness is also an essential indicator; the legs should feel solid and not limp. Choosing high-quality crab legs is crucial, as this directly impacts the taste of the final dish, making freshness a priority for any seafood lover.

Another vital ingredient is water, used primarily for boiling or steaming the crab legs. To boil snow crab legs, fill a large pot with water and add a liberal amount of salt. This seasoning is essential, as it helps to accentuate the crab’s natural flavors during the cooking process.. When boiling, it’s important to bring the water to a rolling boil before adding the legs to ensure they cook evenly.This method keeps the legs juicy and succulent, enhancing the overall dining experience.

Seasonings play a significant role in amplifying the flavor of snow crab legs. While delicious on their own, various seasonings can elevate their natural sweetness. Popular options include Old Bay seasoning, garlic, and lemon juice. Melted butter is a classic accompaniment that adds richness, while fresh herbs like parsley or dill provide color and depth. These key ingredients work together to create a memorable dish that showcases the delightful taste of snow crab legs and makes for an irresistible seafood feast.

A collection of key ingredients for cooking snow crab legs: fresh snow crab legs, sea salt, garlic, lemon wedges, and melted butter on a rustic kitchen countertop.

Explore the culinary delights of snow crab legs and learn how to prepare this exquisite seafood treat

 Recommended Cooking Methods for Snow Crab Legs

Boiling Snow Crab Legs

Boiling is one of the most popular and straightforward cooking methods for snow crab legs, delivering tender and flavorful results. To begin, fill a large pot with water, ensuring it is salted generously to enhance the crab’s natural flavor. Bring the water to a rolling boil before carefully adding the thawed crab legs. It’s essential to keep the pot boiling continuously throughout the cooking process.
For optimal results, boil thawed snow crab legs for approximately 4 to 6 minutes, while frozen legs require a longer cooking time of about 8 to 10 minutes. This ensures the meat is thoroughly heated and retains its natural flavor and tenderness. Timing is crucial, as overcooking can lead to rubbery meat. When the legs are heated through, they will turn a beautiful orange color. This method efficiently brings out the inherent sweetness of the crab meat, making it a classic choice for seafood lovers.

Steaming Snow Crab Legs

Steaming is another excellent method for cooking, as it helps retain moisture while enhancing the meat’s delicate texture. To steam, fill a large pot with a few inches of water and bring it to a boil. Place a steamer basket above the boiling water, making sure it does not touch the liquid. Arrange the thawed snow crab legs in the basket and cover the pot to trap the steam inside. Steam the legs for about 5 to 7 minutes, ensuring they heat evenly. Steaming is a gentle cooking technique that allows the inherent flavors to concentrate, resulting in juicy, flavorful crab legs that are perfect for dipping or pairing with a light sauce.

Grilling Snow Crab Legs

Grilling snow crab legs adds a delightful smoky flavor that beautifully complements their natural sweetness. After boiling, brush the legs with melted butter and your choice of seasonings or marinades for added flavor. Preheat your grill to medium heat and place the crab legs directly on the grates. Grill for approximately 5 to 7 minutes, turning occasionally to achieve even char marks. This method not only enhances the flavor but also provides a lovely texture and unique taste that elevates your seafood feast. Serve grilled legs with lemon wedges and your favorite dipping sauces for an unforgettable dining experience.

A preparation scene for snow crab legs, displaying thawed crab legs on a cutting board with garlic, lemons, and seasonings, set in a warm kitchen ambiance.

Explore the culinary delights of snow crab legs and learn how to prepare this exquisite seafood treat

Serving Suggestions and Dipping Sauces

When it comes to serving snow crab, presentation is key to an enjoyable dining experience. Arrange the cooked crab legs on a large platter, emphasizing their vibrant reddish-orange color and impressive length. Garnishing with fresh lemon wedges adds a pop of color while providing a zesty complement that enhances the sweetness of the crab meat. Fresh herbs like parsley or dill can be sprinkled on top for an elegant touch, making the dish visually appealing and inviting. For a more interactive experience, consider serving the crab legs on a seafood-themed table, accompanied by tools like crab crackers and seafood forks, allowing guests to easily access and enjoy the tender meat inside.

Dipping sauces play a crucial role in elevating the flavor of this recipe and enhancing the overall dining experience. The classic choice is melted butter, often infused with minced garlic and a squeeze of lemon juice for added richness and flavor. This simple but delicious sauce beautifully complements the natural sweetness of the crab meat. Another popular option is a tangy cocktail sauce, made from ketchup mixed with horseradish, lemon juice, and Worcestershire sauce, offering a refreshing kick. For those who enjoy bold flavors, a spicy aioli or a zesty remoulade can provide a delightful contrast to the sweetness of the crab. By providing a variety of dipping sauces, you allow guests to customize their experience and explore different flavor combinations, making your snow crab leg feast unforgettable.

A display of various cooking methods for snow crab legs, featuring boiling, steaming, and grilling techniques, showcasing the culinary process in a warm kitchen environment.

Explore the culinary delights of snow crab legs and learn how to prepare this exquisite seafood treat

Chef’s Note

Snow crab legs are a fantastic choice for a special seafood meal, and with the right preparation and presentation, they can truly shine at your dining table. One of the keys to a successful dish is to avoid overcooking the crab legs, as this can lead to rubbery meat that detracts from the naturally tender texture.

Don’t be afraid to experiment with different seasonings and dipping sauces to find your perfect flavor combination. While traditional melted butter is a must-have, consider trying flavored butters infused with herbs, garlic, or spices for a unique twist.

Presentation matters, too; the visual appeal of your dish can enhance the overall experience. Garnishing with fresh herbs and lemon wedges not only brightens the plate but also invites guests to dig in. Finally, remember that enjoying snow crab is as much about the experience as it is about the flavor. Encourage your guests to take their time cracking the shells and savoring the sweet meat, creating a fun and memorable gathering around the table. Enjoy your culinary adventure with snow crab , knowing you’re serving a dish that is both delicious and nutritious !

By: Gastronome Recipes

Quick and Easy Shrimp Biryani for Busy Weeknights

An inviting spread of shrimp biryani served in a brass bowl, garnished with fresh herbs and accompanied by raita and lime.

Experience the rich flavors of shrimp biryani, a delightful dish featuring aromatic spices and succulent shrimp.

Introduction

Shrimp biryani is a delicious and aromatic dish that embodies the essence of comfort food while offering a delightful twist to traditional rice meals. With its origins rooted in South Asian cuisine, biryani is a celebratory dish that combines fragrant basmati rice, succulent shrimp, and a blend of rich spices, creating a symphony of flavors that tantalize the palate.

In our fast-paced world, where busy weeknights often leave little time for elaborate cooking, a quick and easy shrimp biryani recipe becomes a perfect solution. This one-pot meal allows you to enjoy the depth of flavor and spices found in traditional biryani without the complexity and time usually associated with it. It is not only efficient but also a great way to bring the vibrant tastes of Indian cuisine into your home.

This blog post aims to simplify the process of making shrimp biryani, making it accessible for everyone, from seasoned chefs to novice cooks. We will provide you with a straightforward recipe that emphasizes key ingredients and cooking techniques, ensuring successful results every time. Along with the recipe, you’ll find practical tips for preparation, cooking methods, and serving suggestions to elevate your dining experience.

Whether you’re looking to impress guests at a dinner party or seeking a comforting meal for your family, this quick and easy shrimp biryani is sure to satisfy. Let’s dive into the world of flavors and aromas and discover how you can create this mouthwatering dish in no time !

What is Shrimp Biryani ?

Shrimp biryani is a vibrant and flavorful rice dish that is part of the broader biryani family, which originates from the Indian subcontinent. Biryani itself is a mixed rice dish that combines fragrant basmati rice with marinated protein—typically meat or seafood—along with a variety of spices, herbs, and aromatic ingredients. The result is a hearty, well-balanced meal that is both aromatic and visually appealing.

At its core, shrimp biryani features succulent shrimp marinated in a blend of spices, then layered with partially cooked basmati rice and finished with a combination of sautéed onions, tomatoes, and fresh herbs. This cooking method allows the flavors to meld beautifully, infusing the rice with the essence of the shrimp and spices.

The dish is characterized by its rich and aromatic flavor profile, which is achieved through the use of traditional spices such as cumin, coriander, cloves, cardamom, and garam masala. These spices not only bring warmth and depth to the dish but also create a stunning aroma that fills the kitchen as it cooks. The addition of ingredients like garlic, ginger, and green chilies further enhances the complexity and overall taste.

Shrimp biryani is often served during special occasions and celebrations, symbolizing hospitality and culinary richness. In recent years, it has grown in popularity as a meal option for busy weeknights due to its versatility, allowing home cooks to prepare a satisfying and wholesome dish in less time than traditional biryani recipes require.

Despite its complexity in flavor, shrimp biryani can be simplified for ease of preparation, making it an ideal recipe for those seeking delicious, home-cooked meals without extensive effort in the kitchen. Ultimately, shrimp biryani is not just a dish; it’s an experience that encompasses the rich culture and heritage of South Asian cuisine, bringing families and friends together around the dining table.

More details

For an in-depth exploration of biryani varieties and cooking techniques, check out this informative article: Learn More About Biryani. For an in-depth exploration of biryani varieties and cooking techniques, check out this informative article: Learn More About Biryani.

An inviting spread of shrimp biryani served in a brass bowl, garnished with fresh herbs and accompanied by raita and lime.

Experience the rich flavors of shrimp biryani, a delightful dish featuring aromatic spices and succulent shrimp.

Key Ingredients for Quick and Easy Shrimp Biryani

To create a delicious shrimp biryani that is both quick and easy, it’s essential to gather the right ingredients. Each component plays a crucial role in contributing to the dish’s overall flavor, texture, and authenticity. Here’s a closer look at the key ingredients you’ll need:

1. Fresh Shrimp

Fresh or frozen shrimp serves as the star ingredient in this dish. When using fresh shrimp, choose medium to large-sized shrimp for the best texture and flavor. If using frozen shrimp, ensure they are thawed properly before cooking. The shrimp should be cleaned, deveined, and patted dry to ensure they absorb the marinades and cook evenly.

2. Basmati Rice

Basmati rice is the preferred choice for biryani due to its long grains and fragrant aroma. This type of rice cooks up fluffy without becoming sticky, allowing individual grains to stand out. For quick preparation, opt for parboiled basmati rice, which reduces cooking time while maintaining the traditional qualities of biryani.

3. Aromatics

The foundation of flavor in shrimp biryani is built on aromatics such as:

  • Onions: Thinly sliced onions are often caramelized to provide sweetness and depth of flavor.
  • Garlic and Ginger: Minced garlic and ginger add pungent, warming notes that brighten the dish.
  • Tomatoes: Fresh tomatoes, diced or pureed, contribute acidity and moisture, balancing the richness of the spices and shrimp.

4. Spices

A carefully selected blend of spices is vital to achieve the characteristic flavors of biryani. Essential spices include:

  • Cumin: Provides earthy warmth.
  • Coriander: Offers a fresh, citrusy taste.
  • Turmeric: Adds vibrant color and a mild flavor.
  • Garam Masala: A blend of warming spices that brings complexity and depth to the dish.
  • Red Chili Powder (optional): For those who enjoy heat, this adds spiciness to the biryani.

5. Fresh Herbs

Fresh herbs like cilantro and mint are crucial for garnish, adding brightness and freshness to the dish. These herbs enhance the flavors, providing a contrasting touch to the richness of the biryani. Be sure to chop them finely for even distribution.

6. Optional Add-Ins

To elevate the dish even further, consider incorporating additional ingredients:

  • Vegetables: Peas, bell peppers, or carrots not only enhance the visual appeal but also add nutrition and texture.
  • Yogurt: A few spoonfuls of yogurt can be mixed with the shrimp marinade to tenderize the shrimp and add creaminess.
  • Fried Onions: Crispy fried onions make a fantastic topping for added crunch and flavor.

By using these key ingredients, you can prepare a flavorful and quick shrimp biryani that captures the essence of this traditional dish while being suitable for busy weeknights. With minimal effort and time, this recipe can provide a satisfying meal that is sure to impress family and friends alike.

An inviting spread of shrimp biryani served in a brass bowl, garnished with fresh herbs and accompanied by raita and lime.

Experience the rich flavors of shrimp biryani, a delightful dish featuring aromatic spices and succulent shrimp.

Simple Steps to Make Shrimp Biryani

Making shrimp biryani may seem daunting at first, but with a few organized steps, you can prepare this delicious and aromatic dish with ease. Here’s a simple and straightforward guide to help you create a flavorful shrimp biryani that is perfect for busy weeknights.

Prepare the Shrimp

  • Cleaning and Marinating: Start by cleaning the shrimp thoroughly under cold water. Devein them if necessary, and pat them dry with a paper towel. In a bowl, mix the shrimp with a marinate of yogurt (if using), minced garlic, ginger, turmeric, red chili powder, and salt. Allow the shrimp to marinate for at least 15-30 minutes to absorb the flavors. This step not only enhances the taste but also helps in tenderizing the shrimp.

Cook the Rice

  • Soaking: Rinse the basmati rice under cool water until the water runs clear. Soaking it for about 30 minutes is recommended, as this helps to elongate the grains and prevents them from breaking during cooking.
  • Boiling: In a large pot, bring water to a boil and add salt. Add the soaked basmati rice to the boiling water and cook until it’s about 70% done (the rice should still have a slight bite to it). Drain the rice and set it aside.

Sauté the Aromatics

  • Creating Flavor: In a large, heavy-bottomed saucepan, heat oil or ghee over medium heat. Add thinly sliced onions and cook until they are golden brown and caramelized. This process brings out their natural sweetness and adds depth to the biryani.
  • Adding Spices and Aromatics: Stir in minced garlic and ginger, cooking for an additional minute until fragrant. Add the diced tomatoes and cook until softened, then sprinkle in the marinated shrimp, sautéing until they turn pink.

Layering the Shrimp Biryani

  • Building Flavors: Once the shrimp is partially cooked, it’s time to layer the dish. Spread half of the cooked basmati rice over the shrimp mixture in the pot. Sprinkle a layer of spices—such as garam masala, cumin, and coriander—along with fresh herbs like chopped cilantro and mint.
  • Finishing Touch: Add the remaining rice on top, creating an even layer. For added aroma and flavor, drizzle a little saffron-infused water or a few drops of lemon juice over the rice.

Simmer to Perfection

  • Cooking Together: Cover the pot with a tight-fitting lid to trap steam. Reduce the heat to low and let the biryani cook for about 20 minutes. This steam helps the flavors meld together and ensures that the rice cooks gently, allowing it to absorb the shrimp flavors while becoming fully tender.
  • Finalizing the Dish: After the cooking time, turn off the heat and let the pot sit with the lid on for an additional 10 minutes. This allows the rice to settle and absorb any remaining moisture.

Serve and Enjoy Shrimp Biryani

  • Fluff and Garnish: Carefully fluff the biryani with a fork, being mindful not to break the rice grains. Garnish with additional fresh herbs, crispy fried onions, or a dollop of raita (yogurt sauce) if desired.
  • Presentation: Serve your shrimp biryani hot, either directly in the pot or on a large serving platter. This dish pairs well with pickles, salad, or a refreshing cucumber raita, making it a complete meal.

By following these simple steps, you can create a fragrant and flavorful shrimp biryani that is sure to impress. Enjoy the process, and don’t hesitate to customize the recipe according to your preferences, whether it be with added vegetables or extra spices. Happy cooking !

An inviting spread of the recipe served in a brass bowl, garnished with fresh herbs and accompanied by raita and lime.

Experience the rich flavors of shrimp biryani, a delightful dish featuring aromatic spices and succulent shrimp.

Serving and Enjoying Your Shrimp Biryani

Once your Shrimp Biryani is perfectly cooked and ready to be served, it’s time to make it an unforgettable dining experience. Here are some tips on how to serve and enjoy this delightful dish.

1. Presentation Matters

  • Choose the Right Dish: Serve your Shrimp Biryani in a large, shallow dish to showcase the vibrant colors and textures. A traditional copper or ceramic pot can add an authentic touch.
  • Garnish: Enhance the visual appeal by garnishing your biryani with fresh chopped cilantro, mint leaves, and a sprinkle of fried onions. A few lemon wedges can add a zing of freshness.

2. Accompaniments

  • Raita: A cooling yogurt-based sauce, such as cucumber raita or mint yogurt, pairs beautifully with the spicy flavors of biryani. It provides a refreshing contrast and helps balance the heat.
  • Salad: Consider serving a simple salad of sliced cucumbers, tomatoes, and onions dressed with lemon juice and spices. This adds a crunchy texture and a burst of freshness to the meal.

3. Beverages

  • Pair your Shrimp Biryani with a refreshing drink. Traditional options include Mango Lassi or a chilled glass of Chaas (buttermilk). For a non-traditional pairing, try a light, crisp white wine or sparkling water with lemon.

4. Serving Style of Shrimp biryani

  • Family Style: Serve the biryani in the center of the table and let everyone help themselves. This creates a warm, communal atmosphere where guests can enjoy sharing.
  • Individual Portions: For a more formal setting, spoon the biryani into individual bowls or plates, ensuring each serving has a good mix of shrimp and rice.

5. Enjoying the Flavors of Shrimp Biryani

  • Encourage your guests to savor the dish slowly. The intricate layering of flavors in Shrimp Biryani is meant to be enjoyed. The combination of spices, the sweetness of the shrimp, and the fragrant rice create a delightful harmony that deserves attention.
  • Mindful Eating: Take a moment to appreciate the aromas before digging in. The rich scents of cooked spices and seafood can enhance the overall experience.

6. Leftovers and Storage for Shrimp Biryani

  • If you have any leftovers, store the biryani in an airtight container in the refrigerator. It can typically be enjoyed for up to 2-3 days. Reheat gently on the stovetop with a splash of water or in the microwave, covered, to maintain the moisture.
An inviting spread of biryani served in a brass bowl, garnished with fresh herbs and accompanied by raita and lime.

Experience the rich flavors of shrimp biryani, a delightful dish featuring aromatic spices and succulent shrimp.

Conclusion

In conclusion, Shrimp Biryani is more than just a meal; it is a culinary experience that brings together the richness of spices, the freshness of seafood, and the aromatic quality of basmati rice. This beloved dish reflects the vibrant flavors of Indian cuisine and can easily be prepared in the comfort of your own home, making it perfect for busy weeknights or special occasions.

1. Celebrating Simplicity and Elegance

  • One of the most appealing aspects of Shrimp Biryani is its simplicity. With just a few ingredients and a straightforward cooking process, you can create a dish that feels elegant and impressive. The layers of flavors develop beautifully, ensuring that even the most novice cooks can achieve restaurant-quality results.

2. Versatility and Customization

  • Shrimp Biryani is highly versatile, allowing you to customize the recipe to suit your taste preferences. Whether you prefer it mild or spicy, with additional vegetables or different types of seafood, the possibilities are endless. This adaptability makes it a great option for diverse palates, accommodating any dietary requirements or ingredient availability.

3. Creating Memories

  • Beyond the fantastic taste, Shrimp Biryani serves as a catalyst for gathering friends and family around the dining table. Sharing a meal is a cherished tradition that fosters connection and celebration. Enjoying a flavorful dish like Shrimp Biryani can lead to memorable moments that linger long after the last bite is taken.

4. Encouraging Culinary Exploration

  • This delightful recipe invites you to explore the rich world of spices used in Indian cooking. Understanding how different spices work together can enhance your culinary skills, encouraging you to experiment with other dishes in the cuisine. Each attempt at making Shrimp Biryani can bring newfound appreciation for the artistry behind these flavors.

5. Final Thoughts

  • As you prepare to serve your Shrimp Biryani, remember that the joy of cooking lies not only in the final outcome but also in the process itself. Whether you’re cooking for yourself, your family, or guests, the act of preparing and sharing this dish can be a fulfilling and rewarding experience. Embrace the simplicity, savor the flavors, and enjoy every moment spent in the kitchen.

In summary, Shrimp Biryani is a delightful dish that encapsulates the essence of comfort food while offering an opportunity for creativity and connection. So gather your ingredients, follow the steps, and embark on a delicious journey that will surely be enjoyed by all.

Chef’s Note

Creating a delicious shrimp biryani doesn’t have to be time-consuming! Here are a few tips to enhance your dish:

  1. Quality Ingredients: Use fresh or high-quality shrimp for the best flavor. Opt for sustainably sourced seafood whenever possible.
  2. Spice Level: Adjust the heat to your preference by adding more or fewer green chilies or using milder spices. Don’t hesitate to experiment!
  3. Rice Perfection: Rinse the basmati rice thoroughly to remove excess starch. This helps achieve fluffy, non-sticky rice.
  4. One-Pot Wonder: This recipe is designed to be a one-pot meal, saving you time on cleanup. Embrace the simplicity!
  5. Customization: Feel free to add vegetables like peas, carrots, or bell peppers for added nutrition and color.
  6. Resting Time: Allow the biryani to rest after cooking. This lets the flavors meld together beautifully and results in a more aromatic dish.
  7. Serving Suggestions: Serve with a refreshing cucumber raita or mixed salad to balance the spices and textures.

Enjoy experimenting with this recipe, and make it your own! Happy cooking !

By: Gastronome Recipes, January 13, 2025